In order to support VMLite VNC Server on non rooted Android devices, a special desktop program, called VMLite Android App Controller, is required to start VMLite VNC Server every time after you reboot your device.
Basically, you install the VMLite VNC Server App on your Android device from Google Play Store, and install VMLite Android App Controller to a Windows PC, a Mac, or a Linux PC. Then you connect your device to the desktop computer using a USB cable, and run VMLite Android App Controller from desktop to start VMLite VNC Server on the device. Once started, you can disconnect your Android device from the computer, and quite this program. You will have to perform this again next time after you reboot your device.
If your Android device is rooted, you don't need to run this desktop program at all.
VMLite Android App Controller is available for Windows PC and Mac, both 32- and 64-bit systems.
Windows PC version:
VMLiteAndroidAppControllerSetup.exeMac version:
VMLiteAndroidAppController.dmgLinux version:
adb-linux.tar.gzDownload the VMLite Android App Controller Windows version to your PC.
Double click the downloaded exe file to start the installation. During installation, there are a few steps that ask you whether to install USB Drivers, click Yes to install them unless you are sure that your device is already accessible through adb (Android Debug Bridge).
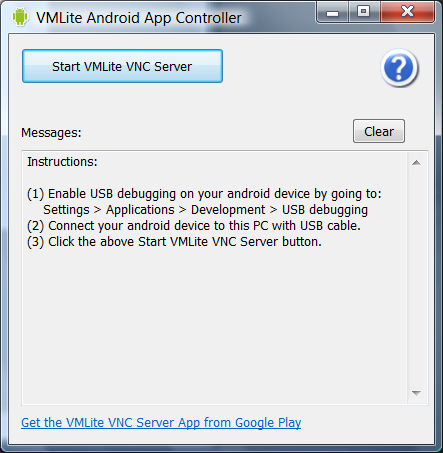
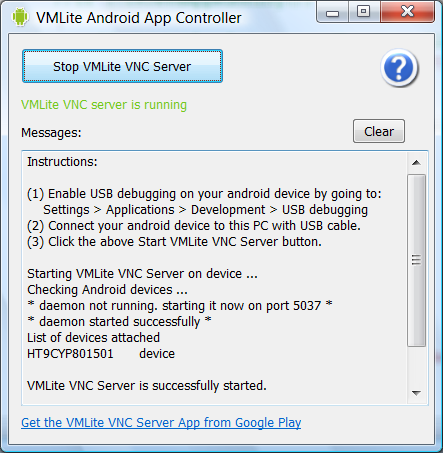
After installation is finished, VMLite App Controller will be automatically launched. Below is a screenshot.
Download the VMLite Android App Controller Mac version to your Mac.
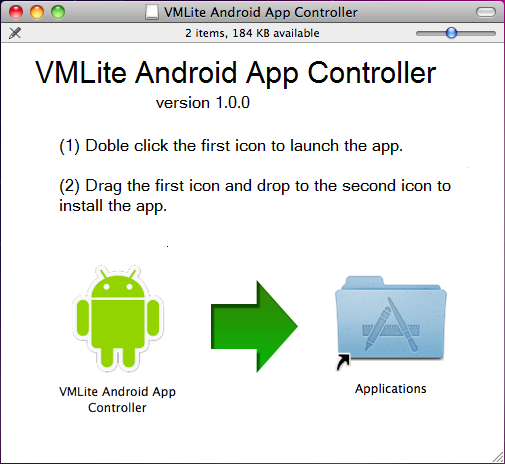
Double click the downloaded dmg file to mount as a virtual disk, as shown in the following screenshot:
You can double click the VMLite Android App Controller icon to launch the application. If you want to install it permanently, you can drag and drop the icon to Applications folder, or any other folders on Mac.
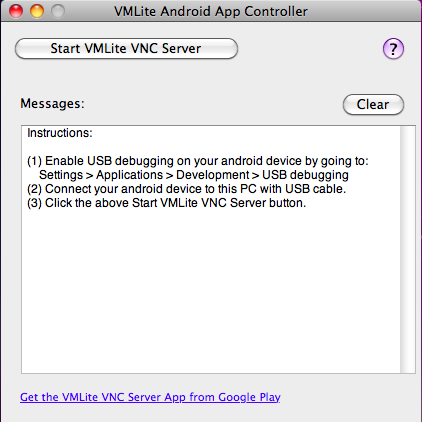
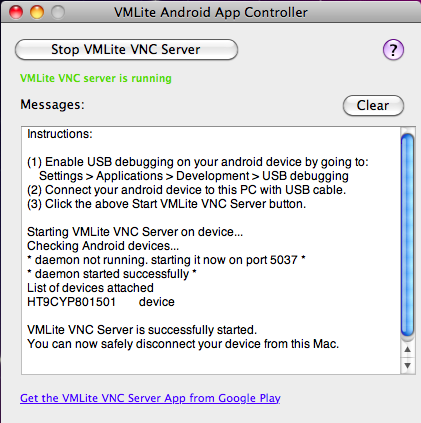
When VMLite Android App Controller is running on Mac, it will display a window similar to the following screenshot.
Download the Android Debug Bridge Linux version to your Linux PC, and run the following command to unzip the file:
tar xvf adb-linux.tar.gz
If for some reason, the adb binaries has no permission for execution, you can run this command to change its permission:
chmod a+x x86/adbchmod a+x amd/adb
Enable USB debugging on your android device by going to:
This needs to be done only once. You may need to reboot your device after USB Debugging is enabled.
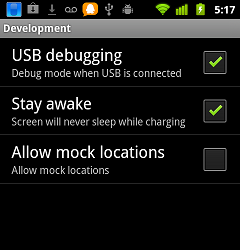
Starting from Android 4.2, Developer options is hidden by default, and you need to make it appear by hand. Go to Setting > About tablet (or About phone), quickly tapping multiple times on Build number, until you see a message "You are now a developer", and you should note that Developer options menu appears inside Settings. When you connect to a PC, if you see a message box "Allow USB debugging?", you need to click OK button to authorize debugging from your computer. You may need to do this everytime when you connect your device to a computer via USB.
Connect your android device to the desktop computer with USB cable.
Launch VMLite Android App Controller from the desktop computer. On Windows PC, you can go to menu Start > VMLite Android App Controller, or double click VMLite Android App Controller icon on your desktop. On Mac, you can launch the application from the mounted dmg file, or from Applicatons folder or any other folder where the application is installed.
Click Start VMLite VNC Server button to start the VMLite VNC Server on the connected Android device. Typical screenshots are shown as below:
On Windows PC:
On Mac:
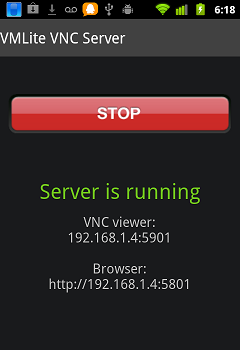
Once the server is started on the device, it will display a running status, as shown below.
Enable USB debugging on your android device by going to:
Starting from Android 4.2, Developer options is hidden by default, and you need to make it appear by hand. Go to Setting > About tablet (or About phone), quickly tapping multiple times on Build number, until you see a message "You are now a developer", and you should note that Developer options menu appears inside Settings. When you connect to a PC, if you see a message box "Allow USB debugging?", you need to click OK button to authorize debugging from your computer. You may need to do this everytime when you connect your device to a computer via USB.
This needs to be done only once. You may need to reboot your device after USB Debugging is enabled.
Connect your android device to the desktop computer with USB cable.
Please read Google's documentation for more information.
Under GNU/linux systems (and specifically under Ubuntu systems), regular users can't directly access USB devices by default. The system needs to be configured to allow such access.
The recommended approach is to create a file
/etc/udev/rules.d/51-android.rules (as the root user) and to copy the
following lines in it. <username> must be replaced by the actual
username of the user who is authorized to access the phones over USB.
# adb protocol on Galaxy S3
SUBSYSTEM=="usb", ATTR{idVendor}=="04e8", ATTR{idProduct}=="6866", MODE="0600", OWNER="<username>"
# adb protocol on passion (Nexus One)
SUBSYSTEM=="usb", ATTR{idVendor}=="18d1", ATTR{idProduct}=="4e12", MODE="0600", OWNER="<username>"
# fastboot protocol on passion (Nexus One)
SUBSYSTEM=="usb", ATTR{idVendor}=="0bb4", ATTR{idProduct}=="0fff", MODE="0600", OWNER="<username>"
# adb protocol on crespo/crespo4g (Nexus S)
SUBSYSTEM=="usb", ATTR{idVendor}=="18d1", ATTR{idProduct}=="4e22", MODE="0600", OWNER="<username>"
# fastboot protocol on crespo/crespo4g (Nexus S)
SUBSYSTEM=="usb", ATTR{idVendor}=="18d1", ATTR{idProduct}=="4e20", MODE="0600", OWNER="<username>"
# adb protocol on stingray/wingray (Xoom)
SUBSYSTEM=="usb", ATTR{idVendor}=="22b8", ATTR{idProduct}=="70a9", MODE="0600", OWNER="<username>"
# fastboot protocol on stingray/wingray (Xoom)
SUBSYSTEM=="usb", ATTR{idVendor}=="18d1", ATTR{idProduct}=="708c", MODE="0600", OWNER="<username>"
# adb protocol on maguro/toro (Galaxy Nexus)
SUBSYSTEM=="usb", ATTR{idVendor}=="04e8", ATTR{idProduct}=="6860", MODE="0600", OWNER="<username>"
# fastboot protocol on maguro/toro (Galaxy Nexus)
SUBSYSTEM=="usb", ATTR{idVendor}=="18d1", ATTR{idProduct}=="4e30", MODE="0600", OWNER="<username>"
# adb protocol on panda (PandaBoard)
SUBSYSTEM=="usb", ATTR{idVendor}=="0451", ATTR{idProduct}=="d101", MODE="0600", OWNER="<username>"
# fastboot protocol on panda (PandaBoard)
SUBSYSTEM=="usb", ATTR{idVendor}=="0451", ATTR{idProduct}=="d022", MODE="0600", OWNER="<username>"
# usbboot protocol on panda (PandaBoard)
SUBSYSTEM=="usb", ATTR{idVendor}=="0451", ATTR{idProduct}=="d00f", MODE="0600", OWNER="<username>"
# usbboot protocol on panda (PandaBoard ES)
SUBSYSTEM=="usb", ATTR{idVendor}=="0451", ATTR{idProduct}=="d010", MODE="0600", OWNER="<username>"
# adb protocol on grouper (Nexus 7)
SUBSYSTEM=="usb", ATTR{idVendor}=="18d1", ATTR{idProduct}=="4e42", MODE="0600", OWNER="<username>"
# fastboot protocol on grouper (Nexus 7)
SUBSYSTEM=="usb", ATTR{idVendor}=="18d1", ATTR{idProduct}=="4e40", MODE="0600", OWNER="<username>"
Launch terminal to run the following command to start the VMLite VNC Server on the connected Android device:
sudo adb shell "am start -a android.intent.action.MAIN -n com.vmlite.vncserver/.MainActivity"
sudo adb shell /data/data/com.vmlite.vncserver/files/vmlitevncserver
Once the server is started on the device, it will display a running status, as shown below:
sudo adb shell "/data/data/com.vmlite.vncserver/files/vmlitevncserver --stop"Once VMLite VNC Server is started on device, you can safely disconnect your device from the computer, and exit the terminal application.
If you want to connect to the VNC Server with USB, and you can run the following commands to forward the TCP/IP traffic, then you can use localhost:5901 with a VNC viewer or http://localhost:5801 with a browser.
sudo adb forward tcp:5801 tcp:5801

sudo adb forward tcp:5901 tcp:5901
In case there are multiple devices connected with USB, and you can run add an "-s" option to the adb command to specify the serial number of the specific device. The serial number is the number displayed by "adb devices", for example:
sudo adb -s HT9CYP801501 shell /data/data/com.vmlite.vncserver/files/vmlitevncserver
You can also set an environment variable "ANDROID_SERIAL" to specify the serial number, and all subsequent adb commands will be sent to that device, for example:
export ANDROID_SERIAL=HT9CYP801501

sudo adb shell /data/data/com.vmlite.vncserver/files/vmlitevncserver
When there is no WIFI available, e.g., at work place, your android device will most likely have a 3G/4G network IP address, unfortunately, almost all wireless service providers do not allow server ports to be visible from outside world, and thus the vnc server running on your device won't receive any connections. In this case, you can try to use USB connection.
Connect your device to a PC or Mac with USB, then launch this VMLite Android App Controller program, click USB Connect button, you will be asked to specify the port number of the vnc server running on your device. The port number should be same as that displayed on our VMLite VNC Server app on your device. The default port number is 5901 for vnc viewers, 5801 for browser connections.
When USB connection is in use, you no longer need the IP address of the device, instead you can use the IP address of your computer for clients to connect.
This is the most common error you may get, which indicates that the desktop computer could not find your android device.
(1) Make sure that you have enabled USB debugging, as described in Instructions section.
(2) Make sure that your device is connected to the desktop computer with a USB cable.
(3) You can try to disconnect and reconnect the USB cable.
On Windows PC, if none of the above can resolve the issue, that means the USB driver is not correctly installed. Please read USB Driver section for more info.
Are you running VMLite Android App Controller inside a virtual machine? VirtualBox seems to have a bug on USB. Make sure you run our program directly on host, instead of a virtual machine.
If you are having problems with USB connection, and observes adb server out of date message, that indicates a conflict between different versions of Android Debug Bridge (adb), which causes USB connection not to work.
If you have HTC devices, and have installed HTC Sync to the PC, most likely you will have difficulty to connect VMLite VNC Server on your device via USB connection, this is because HTC automatically starts its version of adb.exe, and interrupts our program's USB port forwarding.
In this case, you either kills the adb from HTC, or use HTC's adb, and run the following from a command window, make sure you change the path according to your installation:
"c:\program files\HTC Sync 3.0\adb.exe" kill-server
"c:\program files\HTC Sync 3.0\adb.exe" forward tcp:5901 tcp:5901
"c:\program files\HTC Sync 3.0\adb.exe" forward tcp:5801 tcp:5801
If you can't start VMLite VNC Server on your device, for example, Samsung S3, Nexus 7 and Nexus 10, etc., you need to change to Camera Device mode.
Plug Android device, e.g., Samsung S3, to the PC. On android device, bring down the menu (swipe from top all the way down), You should see your USB connection there. Tap it to see more options. Change from "MTP" (Media Device) to "PTP" (Camera).
Our program relies on adb to communicate with your devices, so it's very important to have a working version of adb.
If you already have an adb that is working well on your device, it's highly recommend that you use your own version. You can click Adb button to change its path.
If for some reason, your device can't be found by the default adb, you can try to change to use the tadb.exe command we prodived in the same folder. Some Morotolla devices and Mini TV boxes need to use tadb.exe.
This section is only relevant for Windows PC. On Mac, there is no need to install any USB drivers. All android devices should be automatically recognized on Mac.
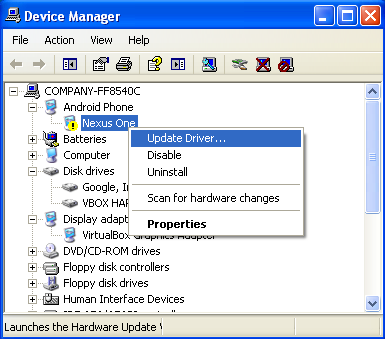
VMLite Android App Controller automatically installs USB drivers for most Android devices. Most of the times, your device should just work without any issues. When your device is working well, you should see a special node named as something like "Android Phone" in Device Manager, shown below:
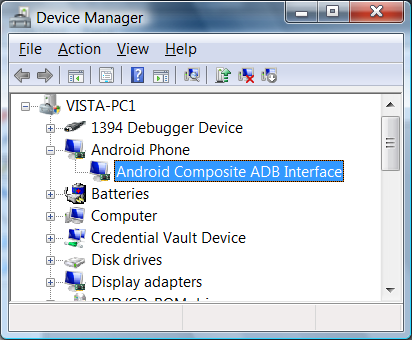
You can open Device Manager this way: Right-click on Computer from your desktop or Windows Explorer, and select Manage. Select Device Manager in the left pane of the Computer Management window.
If your device is connected to the computer, however you can't find such a node in Device Manager, or the node shows the device is not working properly, that indicates that the USB driver is not installed correctly.
The first thing you can try is to update the driver.
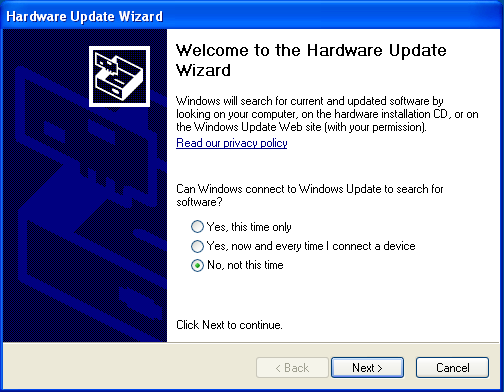
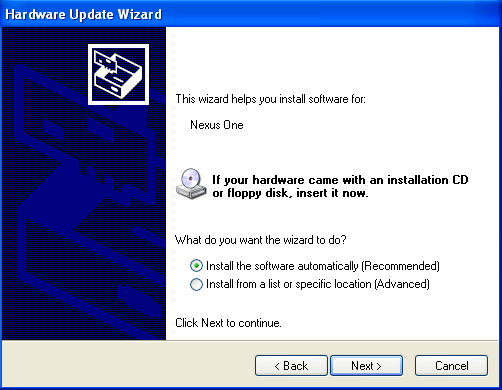
1) On Windows XP, right click the node in Device Manager, and select Update Driver..., and choose No, not this time in Welcome to the Hardware Update Wizard screen, click Next button, then choose Install the software automatically (Recommended) on next screen.
2) On Windows Vista and above, right click the node in Device Manager, and select Update Driver Software..., then select Search automatically for updated driver software on next screen.
If updating driver still can not resolve the issue, you may need to install the USB driver by hand. For more information, please visit Google's Android USB installation page.
Click here to read the acknowledgments.